
Before we start configuring SAN Switches, I want to discuss a little bit about what if our Host Bust Adapter driver is not installed on ESXi server and how to fix that.
If HBA driver is installed on ESX, you can see the WWN ports automatically on your switches or on the Storage Management Client during the adding host process. If you don’t see it, it means HBA drivers is not installed. Also you can check missing HBA driver, if esxhost HBA does not have a light in back panel on the server. If your HBA driver is installed on ESXi servers, just skip this part.
To fix this first enable SSH on ESXi Server. Go to ESX server and navigate to Troubleshooting option> Enable SSH.
First we need to know hba model. You can use the command below on putty and search for HBA.
esxcli hardware pci list

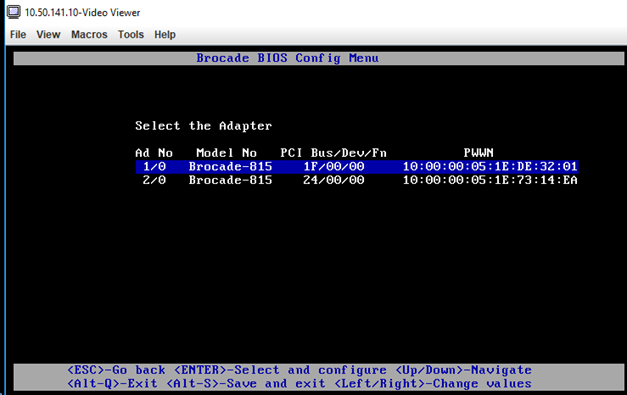
On IBM servers during the reboot I entered “Diagnostic” and then Ctrl + B to enter HBA config. There I could see that my HBA model is Brocade 815.
Then download the driver from vmware. Upload the VIB entensioned file to ESXi server under the folder “/var/log/vmware” using WinSCP or such application.
On Putty
cd /var/log/vmware
esxcli software vib install -v <nameOfTheVIBFile> and press enter. Reboot when installation is done.

SAN Switch Configuration:
I will configure SAN switches using a serial cable from my laptop. For this you need to use a usb to serial cable like this.

After you connect this cable, you can see it from Device Manager on your computer.

Use Putty and select Serial Connection type

For this switch the default username and password is: admin/password
Procedure:
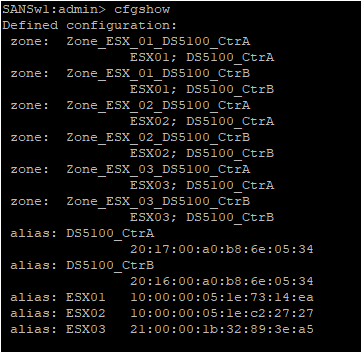
We need to create an alias for each host and storage controller nodes. Our goal is that each host has its own zone that connects the server to the storage Controller's A and B nodes.
For example, assume we create a zone named: Zone_ESX_01_DS5100_CtrA. We will add ESX01 and DS5100_CtrA aliases into this zone. Then we will create another zone named: Zone_ESX_01_DS5100_CtrB. We will add ESX01 and DS5100_CtrB aliases into this zone.
So, I will have 6 zones in my setup if we have 3 servers and 2 storage controllers.
Zone_ESX_01_DS5100_CtrA
Zone_ESX_01_DS5100_CtrB
Zone_ESX_02_DS5100_CtrA
Zone_ESX_02_DS5100_CtrB
Zone_ESX_03_DS5100_CtrA
Zone_ESX_03_DS5100_CtrB
In the future you might buy another storage(lets name it MD3200) and you might need your servers to communicate to that new storage. Then you will create 6 more zones like below.
Zone_ESX_01_MD3200_CtrA
Zone_ESX_01_MD3200_CtrB
Zone_ESX_02_MD3200_CtrA
Zone_ESX_02_MD3200_CtrB
Zone_ESX_03_MD3200_CtrA
Zone_ESX_03_MD3200_CtrB
Then we add members (aliases) in those zones. We enable the configuration and then we save it.
If you have old config on your SAN switch you can delete the existing config first running cfgclear command and then running cfgdelete commands.
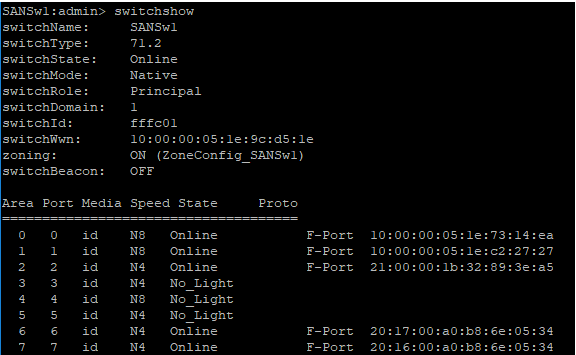
Run switchshow command and make sure you can see all connected WWN addresses.
1- CREATE ALIASES

2- CREATE ZONES
After zonecreate command, argument1 is the name of our zone and argument2 is the ESXi Host alias

3- ADD ZONE MEMBERS TO THE ZONES

Run cfgshow to see our zones and aliases that we created
4- CREATE A ZONE CONFIGURATION
Now we need to create a zone config by using cfgcreate command, I will name it as Cfg_Sw1. While we creating this zone config, we need to add a zone into this zone config.

Now I need to add other remaining zones to this config by using cfgadd command

cfgshow command will show the Zone Configuration

5- ENABLE THE ZONE CONFIGURATION
cfgenable command will replace the old zone config with the one that we have created and sets our new config as effective config

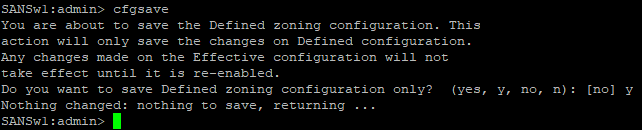
6-SAVE THE ZONE CONFIGURATION
Run cfgactvshow command and see the effective zone configuration information. The configuration we made should be displayed on our switches.

That's it for SAN Switch configuration. Follow the same procedure for the Switch2.
In Part5 we will prepare our storage unit.