
In these article series, we will be installing patroni cluster on ubuntu 24.04 with secure SSL communication.
By using SSL certificates in our cluster:
a) We ensure that communication among etcd nodes (peer-to-peer) and communication between etcd clients (such as Patroni) and etcd servers is fully secured.
etcd peer traffic → mTLS encrypted (port 2380)
Patroni → etcd client traffic → TLS/mTLS encrypted (port 2379)
b) We ensure that PostgreSQL replication between database nodes is also fully secured.
Primary ↔ Replica replication stream (WAL streaming) → TLS encrypted (port 5432)
Additionally, mTLS ensures each replica is authenticated
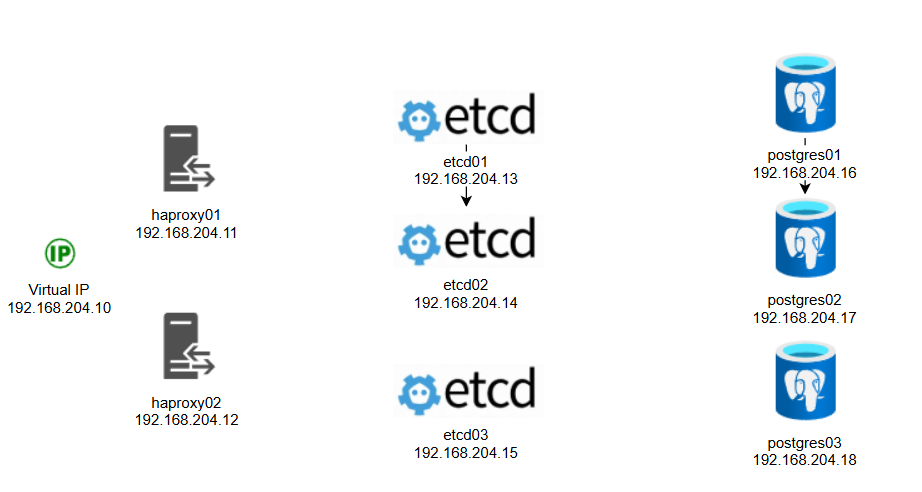
The ip address are assigned as follows. Postgres nodes have a secondary disks for postgres data which are XFS LVM because XFS is optimized for large files and databases. In Prod environment separating data and WAL on different logical volumes (and ideally different disks) is a good idea. By doing so, you can reduce latency spikes during checkpoint flushes.
If you don't have a DNS server in your environment make sure you add your hosts and IP addresses to /etc/hosts file.
192.168.204.10 vip
192.168.204.11 haproxy01
192.168.204.12 haproxy02
192.168.204.13 etcd01
192.168.204.14 etcd02
192.168.204.15 etcd03
192.168.204.16 postgres01
192.168.204.17 postgres02
192.168.204.18 postgres03
192.168.204.19 barman
(Optional) Adding the second disks to Postgres nodes (Postgres Nodes Only):
You can scan the new disks by using the following command. That way, you will not have to reboot the server.
for host in /sys/class/scsi_host/*; do echo "- - -" | sudo tee $host/scan; ls /dev/sd* ; done
By using "lsblk" command, you can see the new disk which is sdb in my case. Let's configure the disk sdb as LVM:
fdisk /dev/sdb

1. Press n to create a new primary partition.
2. Press p for primary.
3. Press 1 for the partition number, depending on the output of the partition table print.
4. Press Enter 2 times.
5. Press t to change the system partition ID.
6. Type 8e to change the Hex Code of the partition for Linux LVM.
7. Press w to write the changes to the partition table.
fdisk -l
pvcreate /dev/sdb1
vgs
vgcreate vg1 /dev/sdb1
lvdisplay
lvcreate -n lvpatroni -L19.50GB vg1
lvs
mkfs.xfs /dev/vg1/lvpatroni
mkdir /patroni
mount /dev/vg1/lvpatroni /patroni
df -h
nano /etc/fstab
#add the following line to the end of fstab, so it mounts automatically after a reboot
/dev/vg1/lvpatroni /patroni xfs defaults 0 0
Make sure /patroni mounted (use df -h)

Generating Self-Signed Certificates:
We will need CA (ca.crt) certificates on all nodes (postgres, etcd nodes, harproxy node is optional). All nodes will have their own certificate and key files. We can generate these files by using Open-SSL. My windows laptop has open-ssl installed already, So I will generate these files on windows and then copy them to the nodes.
Create a new folder named certs in the following path: C:\Program Files\OpenSSL-Win64\bin\
Generate Certificate Authority key (private key). Later, we will use this key to sign CSRs (certificate signing requests) to create the certificates (ca.crt, etcd01.crt, postgres01.crt etc)
openssl genrsa -out ca.key 2048
Generate Certificate Authority's certificate:
openssl req -x509 -new -nodes -key ca.key -subj "/CN=cluster-ca" -days 7300 -out ca.crt
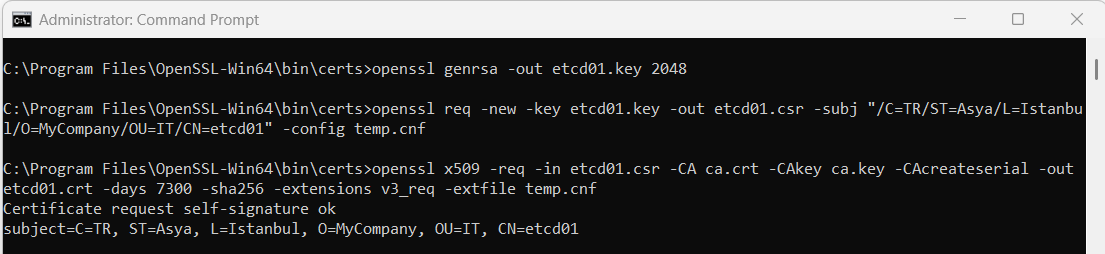
Important Note: The below steps has to be done for each node seperately. I am demonstrating only node etcd01.
Step1: Generate the key file
openssl genrsa -out etcd01.key 2048
Step2: Create the config template
In certs folder, create text file named temp.cnf. This will be used as a template when generating the certificates. Content of that file is below for node "etcd01-192.168.204.13".
[ req ]
distinguished_name = req_distinguished_name
req_extensions = v3_req
[ req_distinguished_name ]
[ v3_req ]
subjectAltName = @alt_names
[ alt_names ]
IP.1 = 192.168.204.13
IP.2 = 127.0.0.1
Step3: Create certificate signing request (csr)
openssl req -new -key etcd01.key -out etcd01.csr -subj "/C=TR/ST=Asya/L=Istanbul/O=MyCompany/OU=IT/CN=etcd01" -config temp.cnf
Step4: Sign the certificate with the CA that we generated earlier
openssl x509 -req -in etcd01.csr -CA ca.crt -CAkey ca.key -CAcreateserial -out etcd01.crt -days 7300 -sha256 -extensions v3_req -extfile temp.cnf
Step5: Copy certificates to the nodes (/var/temp folder)
scp ca.crt etcd01.crt etcd01.key This email address is being protected from spambots. You need JavaScript enabled to view it. :/var/tmp/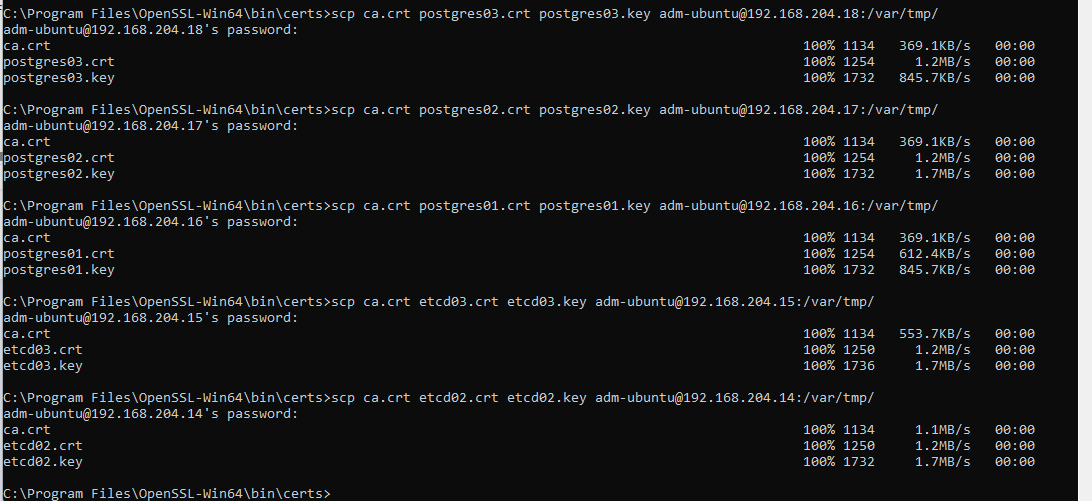
Follow the same steps (Step1, 2, 3 4 and 5) for the rest of the etcd & postgres nodes. In temp.cnf, just change the ip address for the corresponding node. haproxy nodes does not need these certificates.