
If you have SQL Database Server in your environment, it is recommended to keep Data and Log files seperate on different disks for a higher performance. If these files are on the same disk, simultaneous I/O activity to data and log files is not possible which results in lower performance. It is best to place data and log files on seperate disks during the installation of SQL Server. If you didn't do so and you want to seperate data and log files, keep on reading. In this article I am going to change the location of Log file and I will move it to a different disk.
Start SQL Server Management Studio and select the Database and click on Properties

We need to disconnect every connection to the database. So, select Restricted Access as Single User Mode under the Options and hit OK.

Single user mode'u seçtikten sonra propertiese tekrar girmeyi denediğimde, zaten bir sessionın açık olduğu hatasını verdi ve girmeme izin vermedi bunu çözmek için öncelikle aşağıdaki T-SQL komutunu kullanarak açık sessionları gördüm.
After I changed to Single User Mode. I was not able to access properties again. It was saying there is already an active session. Use T-SQL command below to see all active sessions.
select d.name, d.dbid, spid, login_time, nt_domain, nt_username, loginame
from sysprocesses p inner join sysdatabases d on p.dbid = d.dbid
where d.name = 'CM_ISU'
go
Session ID was 61 and by using kill command I ended that session as well.
kill 61
go
Now we are able to access properties of the dabase. I have 2 disks labeled as F and L. Both data and log files are on F.

I created the folders as below.
L:\Program Files\Microsoft SQL Server\MSSQL11.MSSQLSERVER\MSSQL\DATA
Now we need to change the NTFS permissions on DATA folder and add MSSQLSERVER Service. Because MSSQLSERVER is a service and not an account we can not find it by searching. Just type in NT Service\MSSQLSERVER and hit OK. Do not hit Check Names.

Give Full Control to MSSQLSERVER.

Detach the database.

Cut and Paste the log file to its new disk which is L:\Program Files\Microsoft SQL Server\MSSQL11.MSSQLSERVER\MSSQL\DATA

Attach the database.

Hit Add and select the database

You will see that Ldf file Not Found. Click on next to it and browse the Ldf file you just moved and hit OK.
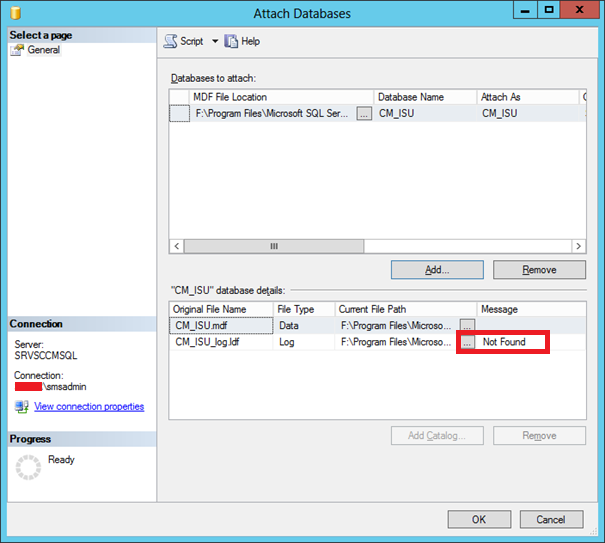
After Attach processes is done, Database will start in Multi_User Mode and you are done.
If you use this Database for SCCM 2012 this process might cause a problem with Software Update Group creation. You might receive the error message below when you are crating a new SUG.

Here is the solution:
By default, the SQL Site Database has the SQL TRUSTWORTHY property set to ON, however when you detach and reattach the database it gets set to OFF. When the database is not configured with this setting ON, <ConfigMgr_Install>\bin\x64\CryptoUtility.dll fails to load into SQL and you get an 'invalid cursor state' message.
1. Set SQL TRUSTWORTHY property ON
Start SQL Server Management Studio and right click on the CM database and select New Query.
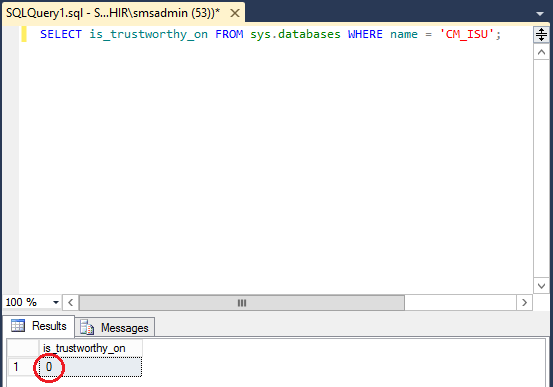
Use the command below to see whether SQL TRUSTWORTHY property is ON (1) or OFF (0)
SELECT is_trustworthy_on FROM sys.databases WHERE name = 'DatabaseName';
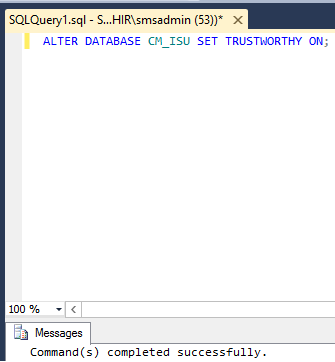
We need to make it ON with the command below
ALTER DATABASE DatabaseName SET TRUSTWORTHY ON;
2. Make sure READ_COMMITTED_SNAPSHOT and ALLOW_SNAPSHOT_ISOLATION values are ON.

3. Ensure that the database that was moved is owned by SA.
Lets see who is the owner currently with the command:
select suser_sname(owner_sid) from sys.databases where name = 'CM_ISU'
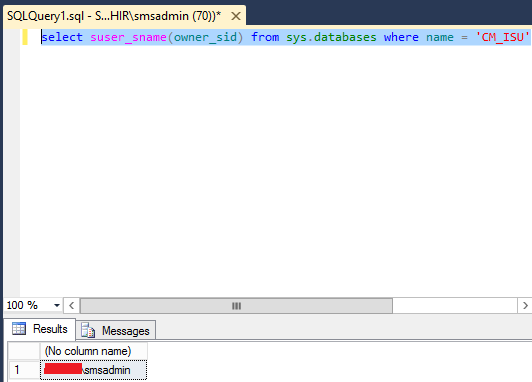
smsadmin is the owner, we need to change the owner to SA with the command below.
ALTER AUTHORIZATION ON DATABASE::CM_ISU TO SA;
You can test it by creating a new Software Update Group on SCCM Console. Problem should be resolved.